
Installation
Our Metal Roof Installation Process, Step by Step
The metal roof installation process at Permanent Metal Roofing Systems follows ten steps, from tear-off to final inspection. Each one exists for a reason, and most metal roof leaks trace back to a step that was rushed. Here is how our own crews install a standing seam roof, using panels and trim we form ourselves.
- 20+ years of experience
- Lifetime limited warranty
- Free written estimates
How Is a Metal Roof Installed?
In short: strip the old roof, repair the deck, dry it in with high-temperature underlayment, set the edge trim and flashing, then lay clips and panels. Ridges, hips and penetrations are sealed last, and the job ends with an inspection.
- Tear-off and disposal.
- Deck inspection and repair.
- High-temperature underlayment.
- Eave and rake trim.
- Valley and wall flashing.
- Clip layout and expansion planning.
- Panel installation and seaming.
- Ridge and hip caps.
- Penetrations and pipe boots.
- Cleanup and final inspection.
A typical home takes several working days on the roof, depending on size, pitch and weather. This page covers the technical sequence; for the customer side, from consultation to warranty registration, see our project process.
What Happens at Each Installation Step?
Each step below explains what the crew does and why it matters on a Texas roof. The details apply to standing seam; notes for exposed-fastener panels follow later.
1. Tear-Off and Disposal
The crew strips everything down to bare decking, including the old underlayment, drip edge and worn flashing. Debris goes straight into a dumpster or trailer instead of onto the lawn, and loose nails are picked up as we go.
Can metal go over shingles instead? Sometimes, but in Texas we usually recommend a tear-off. It exposes rot, lets us re-fasten the deck and avoids trapping heat under the new roof. Our guide on metal roofs over shingles covers the tradeoffs.
2. Deck Inspection and Repair
With the deck bare, we walk every sheet. Soft spots, delaminated plywood, rotted edges and loose sheathing get replaced or re-fastened, and damaged areas are photographed for your records.
Standing seam needs a flat deck. Humps and dips telegraph through the flat pans as oil canning, so this step protects the finished look as well as the structure.
3. High-Temperature Underlayment
Metal roofs in Texas run hot, so the underlayment must be rated for it. Many ordinary synthetics and self-stick membranes are rated only to about 180 to 240 degrees F; we use high-temperature products rated roughly 240 to 265 degrees F.
Self-adhered high-temp membrane goes wherever water concentrates: eaves, valleys, penetrations and low-slope areas. The field gets high-temp synthetic or full membrane, depending on slope, and mechanically seamed roofs at 3/12 and under get Pro HT underlayment, as the panel data calls for.
4. Eave and Rake Trim
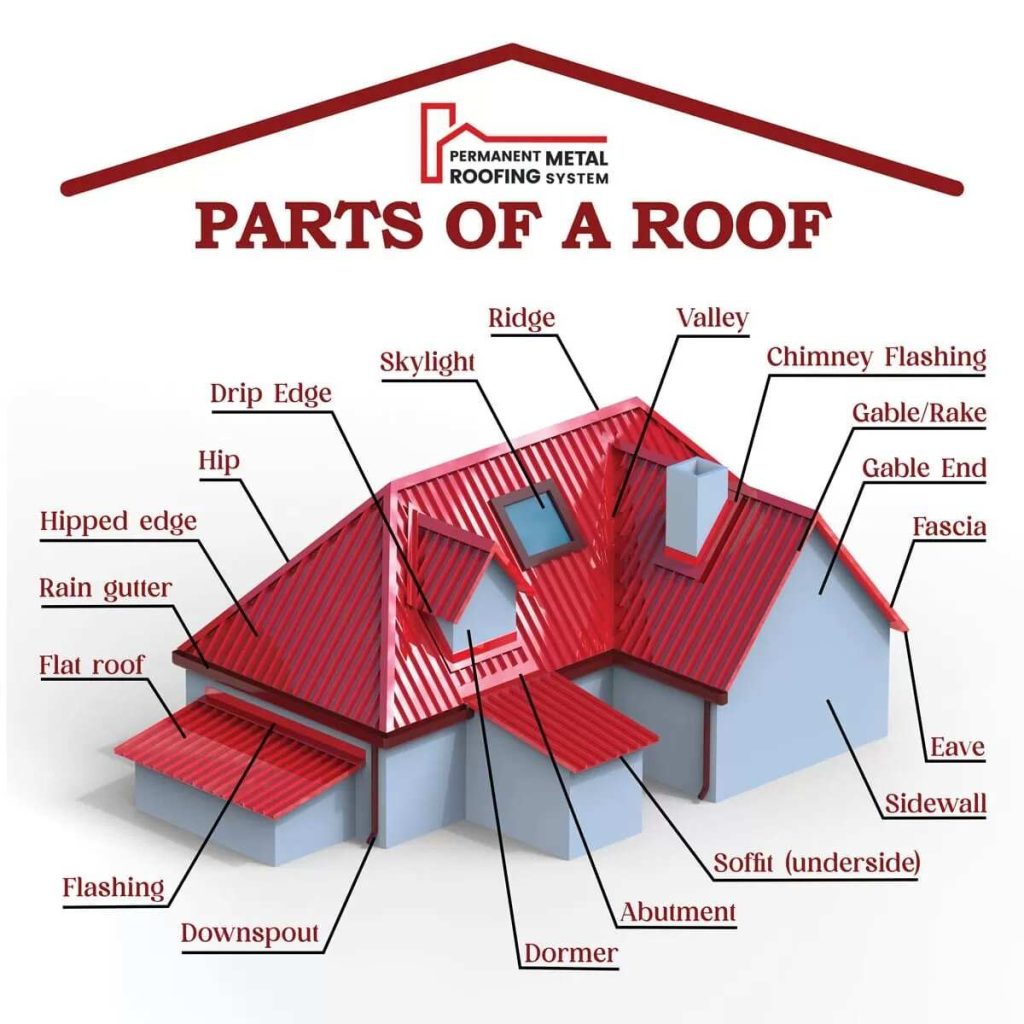
Edge metal goes on before any panel. Eave trim throws water clear of the fascia and gives each panel a hem to lock onto, while rake trim closes the gable edges and holds the outer panels.
Both come from our shop, bent to the roof’s pitch and fascia depth. Our eave flashing page shows the profiles.
5. Valley and Wall Flashing
Valleys carry more water than any other part of a roof. We set a full-width metal valley over self-adhered membrane, and panel ends are hemmed and cleated so water cannot creep back.
Where the roof meets a wall, sidewall and headwall flashing go in, with counterflashing or a reglet cut into masonry, so water runs over the trim and never behind it. See our metal flashing work for the full range.
6. Clip Layout and Expansion
Standing seam panels are held by concealed clips, not screws through the panel. Clip spacing comes from the engineering or the panel tables, and it tightens near eaves, rakes and ridges where uplift peaks.
Steel panels grow and shrink with temperature, and a DFW roof swings from freezing mornings to blazing afternoons. On long runs, panels are pinned at one point and ride on floating clips elsewhere, so they slide instead of buckling. On longer panels we also recommend stiffening ribs to minimize oil canning.
7. Panel Installation and Seaming
Panels are formed to the exact run length, either in Mesquite or right at your house on our mobile roll former, so most slopes need no end laps at all. The crew squares the first panel to the eave, then locks each panel over its clips.
Snap lock seams close by pressing them together along their length. Mechanical lock seams are folded to 90 or 180 degrees with a motorized seamer, which is why mechanical lock is rated down to 1/2:12. Seaming to specification is also what qualifies a roof for the optional third-party weather-tightness warranty an owner can purchase.
8. Ridge and Hip Caps
At the top, panel ends are closed with profile-matched closures and sealant, then capped. A vented ridge is available where the attic needs exhaust, and it pairs with intake at the soffits.
Hip caps follow the same approach along each hip, bent in our shop to the exact angle where two slopes meet. The Z-closure details are on our flashing page.
9. Penetrations and Pipe Boots
Vent pipes, exhaust stacks and skylights are where many metal roof leaks begin. Round pipes get a flexible boot that conforms to the panel, set in sealant and fastened, and larger penetrations get a fabricated curb or cricket so water flows around them instead of pooling.
Chimneys receive step and counterflashing, a cricket when they are wide, and, if you want one, a custom cap built while the crew is on the roof.
10. Cleanup and Final Inspection
Every day ends with debris picked up and open areas dried in. At the end, we clean the yard and driveway, check every seam, fastener line and flashing, and touch up scratches with matched paint.
Then we walk the finished roof with you. That walkthrough opens the final stages of our customer process.
How Does Installation Differ by Roof System?
The ten steps stay the same, but slope limits, attachment and seaming change with the system. This table summarizes the differences for the systems we install most.
| Detail | Snap lock | Mechanical lock | Exposed fastener |
|---|---|---|---|
| Minimum slope | 3/12 | 1/2:12 | Typically 3/12 corrugated; lower for ribbed panels with sealed laps |
| Substrate | Solid deck; the 1.75 in. panel can also span open framing | Solid deck; the 2 in. panel can also span open framing | Deck or open purlins |
| Attachment | Concealed clips | Concealed clips | Screws through the panel face |
| Seam closing | Snaps together by hand | Motorized seamer, 90 or 180 degrees | Lapped and screwed |
| Underlayment | High-temp synthetic plus membrane at details | High-temp; Pro HT at 3/12 and under | High-temp over decks; vapor retarder over purlins |
| Typical use | Homes and light commercial roofs | Low slopes and demanding commercial work | Shops, barns, porches and metal buildings |
Exposed-fastener roofs skip the clip layout. Instead, screws are set on the panel maker’s pattern at every purlin. Compare those profiles on our corrugated and PBR roofs page, or start with the full standing seam lineup.
What Changes for Installs in Dallas-Fort Worth?
Heat, hail and spring storms shape how we detail every DFW roof, and local permits matter too.
- Heat: North Texas sees roughly twenty 100-degree days in a typical year, so clips and underlayment are chosen for big temperature swings.
- Storms: in spring we plan tear-off so each section can be dried in before the crew leaves, which keeps an afternoon storm off the bare deck.
- Hail: thicker 24-gauge steel dents less, and Class 4 ratings belong to specific tested assemblies.
- Permits: Dallas issues re-roof permits for whole-roof replacements, Fort Worth wants a building permit, and each suburb sets its own rules.
Insurance adds paperwork. If you want an impact-resistance credit, keep the product labels and our installation documentation; each carrier sets its own credit, as our Class 4 metal roofing page explains.
What Sets the Cost of an Installation?
The price for your roof comes in a free, written, itemized estimate after we measure, and the steps above explain most of what drives it.
- Tear-off: how many layers come off, and how many dumpsters the job fills
- Deck repairs found once the old roof is off
- Pitch: roofs at 8/12 and steeper need extra safety setup and time
- Penetrations: pipe boots, skylights and chimneys to flash
- Ventilation: a vented ridge where the attic needs exhaust
- The system itself: snap lock, mechanical lock, gauge and finish
Your written estimate lists each of these as its own line, so you can see where every part of the price goes. Our metal roof cost guide explains them in more depth.
Photos From the Job Site
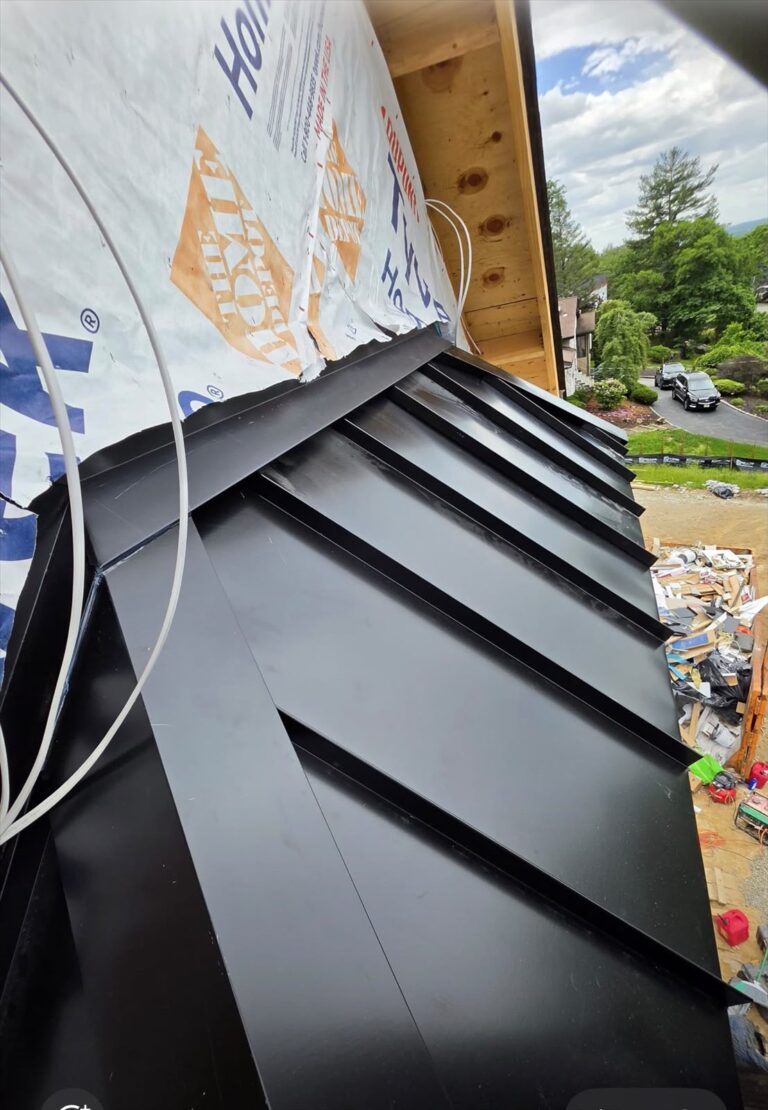
On new construction the panels often go on before the siding, so the wall flashing can tuck behind it. Here is what those stages look like.



Metal Roof Installation Questions
How many days does a metal roof installation take?
Most single-family homes take several working days on the roof once materials are ready. Size, pitch, layers to tear off, the number of penetrations and weather all change that. Panels and trim are formed before the crew arrives, so time on your roof is mostly installation.
Do you tear off the old roof or install over it?
We usually tear off. Removing the old roof lets us inspect and repair the deck, re-fasten loose sheathing and lay underlayment on a clean surface. An overlay can work in limited cases, but it hides problems and traps heat under the new metal.
What underlayment goes under a metal roof in Texas?
A high-temperature underlayment rated roughly 240 to 265 degrees F, because standard synthetics and peel-and-stick membranes can soften under hot metal. Self-adhered high-temp membrane goes at the eaves, valleys and penetrations, with high-temp synthetic or membrane across the rest of the deck.
Why do standing seam panels need floating clips?
Steel and aluminum expand and contract every day. Floating clips let long panels slide as they move, so the panels do not buckle or tear at fasteners, and stiffening ribs on longer panels reduce oil canning.
Can you install a metal roof in the Texas summer?
Yes. Metal roofs go on year-round in DFW. In summer, crews plan the heaviest work for cooler hours and set clips with expansion in mind. In spring, we watch storm forecasts and plan to dry in each section before leaving it.
What is checked in the final inspection?
We check every seam, clip line, fastener, flashing and penetration, and touch up any scratches. Then we review the roof with you, using close-up photos if you would rather stay on the ground, and close out any punch-list items before registering your warranty.
Free Estimate
Tell us about your roof and we will measure it, explain the installation plan and send a written, itemized estimate.
Get Your Free Metal Roof Estimate
Tell us about your roof. Our Mesquite office calls back the same business day to set up a free measurement and an itemized written estimate.
Prefer to talk now? Call (469) 466-2421.
See the Installation Process on Your Own Roof
We will inspect your roof, walk you through each step and price the full system in writing.